Context & Inspiration
I was inspired last month by RStudio::conf (2019) to start publishing some of the fun R work I have been doing. About a year ago a good friend of mine, Brett Kubold, turned me on to Jeff Allen’s plumber package. This package allows you to easily turn your R scripts into deployable APIs. Given my extensive use of RShiny, I struggled to find good use-cases for this until recently when we decided to build an internal chatbot for my startup Retina.
The goal of our bot `/tina` was to enable employees at the company query for random stuff like: status of current Facebook campaigns, a snapshot of our Trello board, plot data using a menu built in Slack, look up company holidays and getting notified about birthdays.
For this purpose, we needed the Slackbot to do two main tasks (1) listen to queries from users and respond to them and (2) have a schedule for running jobs and notifying employees about certain events. Below is a quick video of some of the cool things this bot does:
In this blog post below, I am going to try to do a detailed walkthrough of how we set this but and show you a simple example of the code.
Tutorial
Pre-requisites
Before you get started I would recommend reading through some of the great blogs written by James Blair from RStudio. (1) Rest API & Plumber (2) Slack + Plumber 1 (3) Slack + Plumber 2.
Here is what you will need before you get started:
You should have a Slack account and enough admin privileges to set up the API.
Be willing to pay $5 / month to DigitalOcean to keep this going. Or use another service.
Download these files to a local folder: Git Repository
A good attitude and some patience.
Setup
Follow the process to set up your Digital Ocean account on the Rplumber.io page. Most of it is pretty easy to follow with the exception of setting up SSH. You should find this article helpful for in case you run into issues, and remember to do this before you create your droplet. If you forget to do this in advance and started your droplet already, you will have to do some work to copy over ssh ids (read this article). I also cover this in detail in the section below called ‘SSH Error Resolution’.
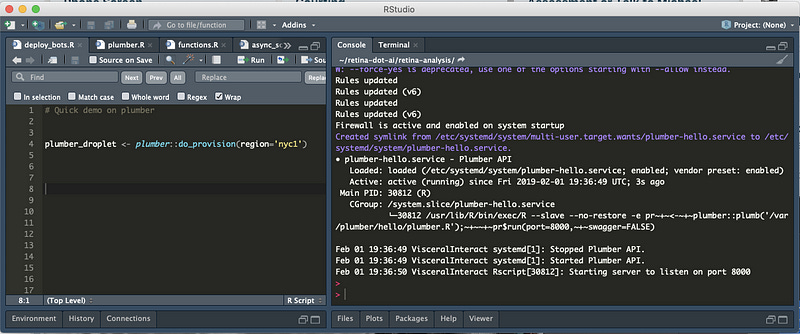
First, on your local RStudio instance, install `plumber` and `analogsea` packages that you will need later. Next, provision a new droplet on Digital Ocean. It may take a few minutes but the results will look like the following if all goes well.
install.packages(‘plumber’)install.packages(‘analogsea’)analogsea::do_oauth(reauth = T)plumber_droplet <- plumber::do_provision(region=’nyc1')Next, install the packages you’ll need for your plumber application. We can install more packages later.
analogsea::install_r_package(plumber_droplet, c(‘config’,
 ‘tidyverse’,
 ‘httr’,
 ‘urltools’,
 ‘plumber’))
Next, you’ll need a `Slack Signing Secret` key. Start by going to this URL and `Create A New App`. Name your app something fun and you will land on a page with something that looks like the following:
You can copy this secret and put it in your `.Renviron` file. You might also be able to use RStudio’s `keyring` feature to store this secret. For simplicity and old-school sake, I have this saved the traditional way. You should have a line in your `.Renviron` file that looks like the following:
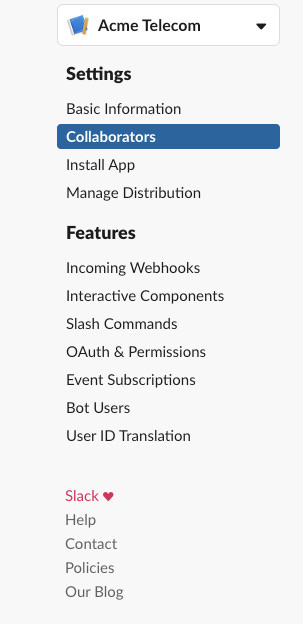
SLACK_SIGNING_SECRET = 2323342343432dwdoyoi234343Next, on the same Slack page, let’s create a new `Slash Command`. And fill out the fields so that it looks like the following. Be sure to replace IP address one for your droplet. (You can get the IP on R by looking at the value of plumber_droplet)
Important: (1) replace the IP with your IP (2) in the request URL be sure to have a trailing forward slash at the end of the URL.
Lastly, you need to install the app to your workspace. Do that by clicking `install` on the Slack API Menu.
After that, you also need to run on `interactive messages` and point those URLs back to your Plumber API.
Plumber
Now let’s create a `plumber` app. Create a new folder, name it `plumber_slack_demo` and put all the files from this repository into the folder. Keep in mind that you need this exact filename for `plumber` to work. Also, another file you want to create/edit is config file in the same folder call `config.yml` with the following text:
default:
 base_url: “http://142.93.3.93/plumber_demo"

rsconnect:
 base_url: “http://142.93.3.93/plumber_demo"
Rest of the files you can copy from my git repo and place in the same folder to get started. In my case, I placed it in `dev/plumber_slack_demo`
Now, let’s try deploying the Plumber API.
droplet_names <- analogsea::droplets()
plumber_droplet <- names(droplet_names)[2]
preflight_cmd <- paste0(“Sys.setenv(‘SLACK_SIGNING_SECRET’ = ‘“,
 Sys.getenv(‘PLUMBER_SLACK_DEMO_SIGNGING_SECRET’), “‘); “)
plumber::do_deploy_api(droplet = plumber_droplet,
 path = ‘plumber_demo’,
 localPath = ‘dev/plumber_slack_demo’,
 swagger = T, port = 8002,
 preflight = preflight_cmd)
Very likely you got the SSH error that I got below.
SSH Error Resolution
If you got the error above, here are steps to solve it. If not, you can skip to the section below.
First, go to Digital Ocean and click `Reset Root Password`
Then from your local machine, ssh into the droplet. It will then ask you update you to update your password (ssh root@142.93.3.93).
Next we want to copy the public portion of your SSH keys to the remote droplet. If you don’t have SSH keys, follow this guide.
Next, let’s copy the SSH id to the remote machine
ssh-copy-id -f -i ~/.ssh/id_rsa.pub root@142.93.3.935. That’s it. You should see this message
Number of key(s) added: 1Now try logging into the machine, with: “ssh ‘root@142.93.3.93’”
and check to make sure that only the key(s) you wanted were added.Deploy
Now let’s test the deployment code above.
plumber::do_deploy_api(droplet = plumber_droplet,
 path = ‘plumber_demo’, localPath = ‘dev/plumber_slack_demo’,
 swagger = T, port = 8002,
 preflight = preflight_cmd)
Any errors you see now should be more related to the packages. For example, before installing `tidyverse` you should SSH into the droplet and run the following commands.
# sudo apt-get update
# sudo apt-get install -y libssl-dev
# sudo apt-get install libcurl4-openssl-dev
# sudo apt-get install libxml2-dev
Then you should be able to run the following command to install `tidyverse` and `httr` on the remote machine.
analogsea::install_r_package(plumber_droplet, ‘tidyverse’)
analogsea::install_r_package(plumber_droplet, c(‘httr’, ‘config’)
If you are able install successfully, you should see a message that looks like the following.
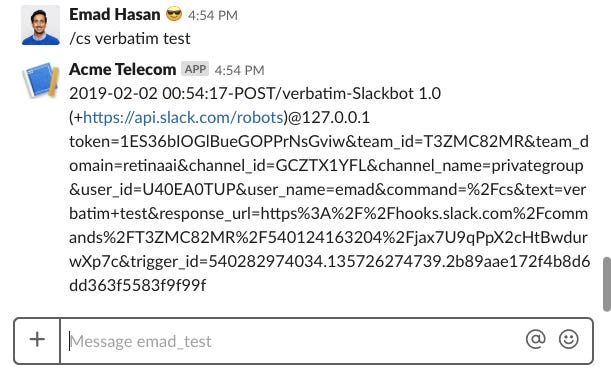
Now, go over to Slack and type in a command `/cs verbatim test`
This will return the full request URL. Now, let’s try an interactive message. Do this by going to your Slack and typing in `/cs joke`
If you get a 500, 404 or 401 error, go to the next section.
Test, Fix & Iterate
Now, let’s go to our slack and try out the `/cs` command and see what happens.
If things don’t work you should see an error like above. To debug this, I would recommend SSH-ing into the remote machine and run the following.
tail /var/log/syslogThis can help you identify if you are missing any packages or have made any syntax errors.
Next, build something amazing
Now, you are ready to build something amazing. Go through Slack’s documentation on different types of messages you can build and respond to.
Other Resources
https://rviews.rstudio.com/2018/07/23/rest-apis-and-plumber/
https://rviews.rstudio.com/2018/08/30/slack-and-plumber-part-one/
https://rviews.rstudio.com/2018/11/27/slack-and-plumber-part-two/

